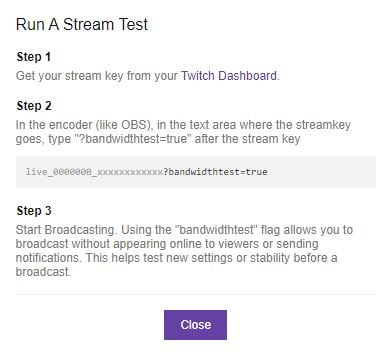
Streaming to Twitch is a fairly easy process but before you go live, you’ll want to make sure there aren’t any technical issues like frames dropping. A way to ensure you’re all ready to go live is to test out your stream. Thankfully, Twitch has a way for you to do that through their Twitch Inspector Tool.
When you first go to the site, you’ll need to authorize Twitch Inspector to connect to your account. Once you do that, click on the purple button that says “run a stream test.” You’ll then need to follow the steps in order to successfully start a test stream

First, you’ll need to grab your stream key from Twitch and input it into your broadcasting software of chose. Where this is will depend on your software, but most of the time this can be found in the settings under stream or broadcast. If you have your Twitch automatically connected, you’ll have to disconnect it because you won’t be able to edit your stream key otherwise, which is necessary to launch a test stream.
At the end of it you’ll want to input “?bandwidthtest=true” and once you do that, you can begin broadcasting. You’ll want to take a look at the Twitch Inspector Site to see how your stream is holding up. If there are any issues, the site will tell you what those problems are. If there aren’t any, you can actually go live, just remember to remove the “?bandwidthtest=true” from your stream key.


Published: Dec 17, 2021 11:13 pm