Conquer the Temple of Atzoatl in this latest league. Here’s everything you should know, including beginner tips, planning, room types, and more.
The free-to-play online action RPG Path of Exile received its latest content update, Incursion (Patch 3.3.0), on June 1 and with it came an all-new league (and the namesake of the update): Temporal Incursions.
Incursions are short-duration visits to the past in which you visit the ancient Vaal Temple of Atzoatl during its construction. Incursions feature multiple types of rooms that offer different threats and rewards, and must be connected to create a path to the Apex of the temple by opening locked doors. Incursions are scaled to the level of the zone in which you enter them. Each time you enter an Incursion, you’ll be placed in a random room of the temple and your goal is to modify the temple’s layout in present day by upgrading or changing rooms in the past, and unlocking locked doors to ensure you can reach the Apex in the present-day Temple.
While this all may sound confusing, it’s actually pretty straightforward once you know what you’re getting into, and can be a whole lot of fun. Incursions feature a relatively unforgiving time limit, starting at 10 seconds, that can be extended by killing mobs and by damaging mini-bosses in the room.
Run out of time and you’ll be teleported out of the room, and if you didn’t get what you needed to get done (namely opening locked doors) you may find yourself having to enter the same room more than once. When you’re first starting out, your character may not be geared or built well enough to clear a path to the Apex. As you grow in levels and earn more powerful gear, you’ll be able to make it through more Incursions and will be well on your way to a precious loot fountain at the end of your present-day Temple run.
The ultimate goal of Incursions is to connect enough rooms to ensure a path to the Apex of Atzoatl, where you’ll fight the Temple’s boss, Vaal Omnitect, in the present-day Temple. The Vaal Omnitect is a challenging boss who can drop special uniques, powerful items, and vials which can be used to upgrade Incursion unique items. In the process of securing this path, you’ll also be upgrading and changing rooms to your desire, offering different benefits and rewards once you run your completed Temple.
Here’s everything you need to know to optimize your Incursion and Temple of Atzoatl runs in Path of Exile.
Getting started with Incursions
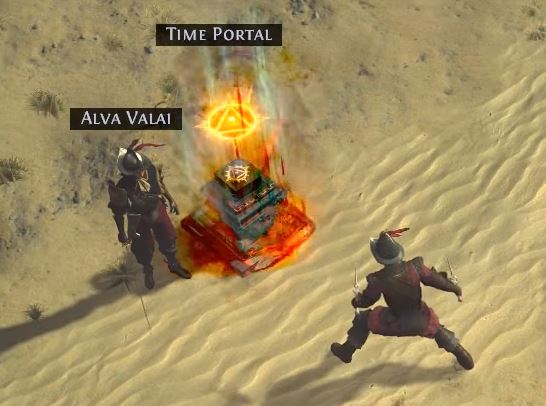
To start an Incursion, locate the NPC Alva Valai, who spawns in every zone from Mud Flats onward and speak with her. You’ll then be granted the opportunity to challenge a specific Incursion. The room she offers to you will not change until it has been cleared, so you’ll have no choice but to enter if you wish to proceed. You’ll have to complete 11 Incursions (rooms) before you’ve earned the right to challenge the present-day Temple, and it’s important to use these trips wisely.
After each Incursion you complete, you’ll receive a fountain of loot that contains all of the treasures you would have earned had you the time to loot the during the Incursion. However, you will still have to loot any Stone of Passage that drop during the Incursion and use them to open the nearest desired door before running out of time, as these items will be removed once you leave an Incursion.
Developing your game plan
When you’re first starting out, you may experience difficulties in clearing rooms without running out of time. In your earlier runs, it’s not too important to worry about completely optimizing your Incursions—take some time (well, not too much time) to familiarize yourself with the different types of rooms and just focus on trying to open any locked doors that lead to the top. Once you’ve gotten the hang of things, you can start developing a clear path to ensure the most optimal path to the Apex of Atzoatl.
Each time you start new Incursions, you’re shown the full map of the Temple being built, as well as which rooms are under construction by powerful minibosses known as Architects. Since you’ll be subject to a strict time limit, it’s important to plan out your path in advance by determining which rooms you wish to visit and in which you’ll need to unlock doors (more on that below).
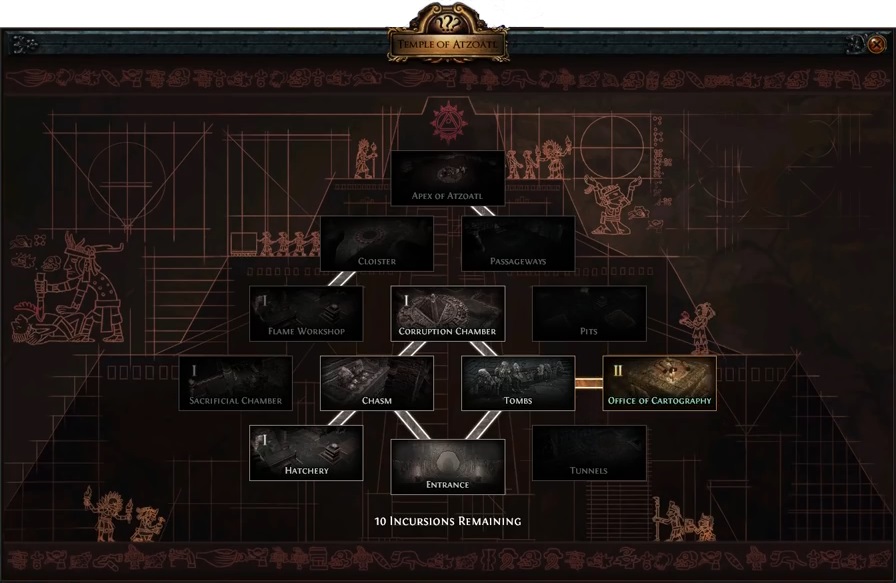
You may wish to focus on visiting the highest tier rooms as well as any treasure rooms you’ve been offered (more on these below, too), but remember to also visit those rooms needed to secure that path to the top. Also, you don’t have to worry about the “Monsters Killed” bar at the bottom of the screen—it doesn’t mean anything aside from the percent of mobs you’ve killed in the room, and you aren’t required to clear the entire room to complete the Incursion.
Upgrading and changing rooms
In each non-empty room you enter, you’ll face two Architects along with the room’s regular hordes of enemies. Killing one Architect will upgrade the room to a higher tier, whereas killing the other will result in the room being changed to a different type entirely. Incursions will start with randomly assigned tiers, higher tiers offering more difficult challenges and better rewards. You can check the Incursion’s current tier by looking at the roman numerals in the left corner of each Incursion, with three being the highest. It’s totally up to you which rooms you choose to upgrade or change to different room types, and these decisions will affect those rooms you’ll encounter in your run through the completed Temple.
Before you even enter an Incursion, you can see which two Architects are in the room as well as what killing them will do to the room, so you can plan in advance which one you wish to kill. You can see this by mousing over the respective room; the upgrade Architect has an upward-facing yellow triangle icon, while the room change Architect displays an icon featuring red and green crossed arrows. The changes that will be made are are also clearly detailed in a tooltip.
Killing one Architect will allow the other to build the room into what it shall be in the present-day Temple. Every time you damage the Architect, you’ll earn much-needed additional time to clear that Incursion. In addition to changing or upgrading a room, killing an Architect may also provide the enemies of the temple with a dangerous map modifier that will affect other Incursions. It’s worth noting that your present-day Temple will not inherit these map mods, but may feature substantially difficult mods of its own.
Opening locked doors
One of the biggest challenges you’ll face in Incursions is the RNG drop rate of Stone of Passage, the keys necessary to unlock the locked doors and connect the different rooms. On the map, each Incursion with potentially connecting rooms will show red or green circles in the position of the door. Red doors are locked and must be unlocked using either a Stone of Passage, which are dropped by enemies, or a Flashpowder Keg, which can be looted in the Explosives Room (I), Demolition Lab (II), or Shrine of Unmaking (III).
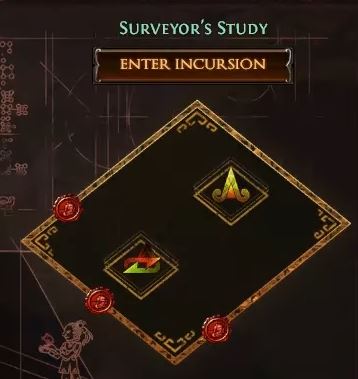
The Stones of Passage have a completely random drop rate from any enemy you kill, but you generally will obtain at least one during your 11 Incursions. The Flashpowder Kegs will spawn only in explosive rooms, and you’ll get one Keg per room upgrade level (so three Kegs at tier III). Unfortunately, you are not guaranteed to have access to an explosive room, so you will likely need to rely on Stone of Passage to get you where you need to go.
If you wish to reach the Apex of Atzoatl and challenge Vaal Omnitect, you will need to use these items wisely to connect any paths. When a path between two rooms is opened, the path will be featured on the full Incursion map, so you can see which rooms you’ll still need to connect. Depending on your luck, you may find that the locked doors are truly the worst enemy you’ll face.
Your Temple of Atzoatl excursion
Once you have completed 11 Incursion runs, Alva will have located the present-day Temple of Atzoatl and will open six portals, so you’ll have multiple opportunities to clear your Temple if things aren’t going so well. You’ll be teleported to the jungle right outside of the Temple and will enter the temple through the Entrance room which was shown on your Incursions map. There is no time limit in the Temple, so you can take your time to battle enemies and collect treasure.
The rooms you’ll face are based on the changes you’ve made during your Incursions, and may have difficult monsters, challenging modifiers or luxurious treasures (or some of everything). It’s worth noting that enemies in the Temple can drop maps, so they can be generally worth killing. There’ll be no loot explosion this time, so be sure to loot any valuable drops that you come across. Once you’ve completed the Temple, either by killing the final boss or running out of portals, your Incursions will reset and you can start working your way through another 11 rooms. The Incursions offered each time are completely random, so it’s unlikely you’ll build the same temple twice.
Types of Incursion rooms
Here’s a brief summary of the different rooms you’ll encounter during your Incursions along with the benefits and modifiers that they feature. Remember that any modifiers applied to a specific Incursion will affect all other Incursions, so be sure not to make things too difficult on yourself. Higher tier rooms will introduce even stronger monster buffs or player debuffs, so be careful which rooms you’re upgrading. There are 78 total Incursions rooms with 22 upgradeable types, and 12 “empty” rooms that cannot be upgraded (such as the Pits or Cellar) and are not included in the list below.
Item and treasure rooms
These rooms contain lootable chests or objects, offering armor, weapons, gems and more. Each tier upgrade will improve the quality of items as well as possibly offer additional benefits.
Armour: Armorer’s Workshop (I), Armoury (II), Chamber of Iron (III). Contains chests full of armour. Monsters throughout the Temple have increased life.
Weapon: Sparring Room (I), Arena of Valour (II), Hall of Champions (III). Contains chests full of weapons. Increases monster damage throughout the Temple.
Jewelry: Jeweller’s Workshop (I), Jewellry Forge (II), Glittering Halls (III). Contain chests full of jewellry.
Gems: Gemcutter’s Workshop (I), Department of Thaumaturgy (II), Doyani’s Institute (III). Contains chests full of gems.
Maps: Surveyor’s Study (I), Office of Cartography (II), Atlas of Worlds (III). Contains chests full of maps.
Breaches: Splinter Research Lab (I), Breach Containment Chamber (II), House of the Others (III). Tier I contains Breach Splinters, tier II contains a single Breach, and tier III contains three Breaches.
Currency: Vault (I), Treasury (II), Wealth of the Vaal (III). Contains chests full of currency items.
Miscellaneous: Storage Room (I), Warehouses (II), Museum of Artifacts (III). Contains chests full of items.
Unique Sacrifice: Sacrificial Chamber (I), Hall of Offerings (II), Apex of Ascension (III). Allows you to sacrifice a unique item for a random unique. At tier III, the item will retain its slot type and Temple Uniques can be upgraded.
Flashpowder Kegs: Explosives Room (I), Demolition Lab (II), Shrine of Unmaking (III)
Strongboxes: Strongbox Chamber (I), Hall of Locks (II), Court of Sealed Death (III)
Tormented Spirits: Torment Cells (I), Torture Cages (II), Sadist’s Den (III)
Rooms that can affect Temple difficulty
These rooms will grant buffs to monsters or debuffs to players in the Temple. Each tier upgrade strengthens these modifiers.
Monster healing: Pools of Restoration (I), Sanctum of Vitality (II), Sanctum of Immortality (III). Heals the monsters in the Temple, causing them to regenerate 8 percent Maximum Life per second.
Poison plants: Poison Garden (I), Cultivar Chamber (II), Toxic Grove (III). Spreads poisonous plants throughout the Temple.
Traps: Trap Workshop (I). Temple Defense Workshop (II), Defense Research Lab (III). Adds traps throughout the Temple.
Tempests: Tempest Generator (I), Hurricane Engine (II), Storm of Corruption (III). Adds certain Tempests to the Temple.
Maximum resists reduction: Corruption Chamber (I), Catalyst of Corruption (II), Locus of Corruption (III). Reduces player maximum resistances throughout the Temple.
Monster movement speed: Royal Meeting Room (I), Hall of Lords (II), Throne of Atziri (III). Increases the speed of monsters throughout the Temple (Cast and Attack Speed).
Monster pack size increase: Guardhouse (I), Barracks (II), Hall of War (III). Increases monster pack size throughout the Temple.
Omnitect upgrade rooms
These rooms will apply a buff to the final boss of the Temple, the Vaal Omnitect, if they are present in your final Temple layout. The tier III versions of most rooms will offer a valuable treasure, but will substantially raise the boss difficulty. Upgrading the Workshop will increase item yield throughout the whole Temple.
Life: Workshop (I), Engineering Department (II), Factory (III)
Fire: Flame Workshop (I), Omnitect Forge (II), Crucible of Flame (III): Augments the Omnitect with fire.
Lightning: Lightning Workshop (I), Omnitect Reactor Plant (II), Conduit of Lightning (III).
Minions: Hatchery (I), Automaton Lab (II), Hybridization Chamber (III).
Have fun raiding the Temple!





Published: Jun 7, 2018 11:30 am